
Advertising Disclosure: I am apart of the Bluehost Affiliate program and am compensated for purchases made through this post.
So, you want to know how to start a blog?
You’ve been itching to write and post it for the world to see. You want to join the community of online entrepreneurs, bloggers, and influencers who are making money in coffee shops and free Wi-Fi, right? Great, first things first let’s be real.
You will not earn money right away. Many influencers and entrepreneurs will advise “…in 3 simple steps you can make X amount of money and work from home.”
It’s just not true. Stop believing the hype.
It takes time to build your brand, and if you’re really passionate the money will come. Now that we’ve got the elephant out of the room, let’s talk about how to start a blog.
I never started out to make blogging a business. When I began, it was to simply write about things I was inspired by as a college student – of course, it has now grown far beyond this, but the passion was there.
Step 1: Choose a Niche
What excites you? What can you grow with?
Before I started my design studio, I started a personal blog because I thought a digital diary was cooler than an old school notebook. Soon I started writing about things that interested me like design, wellness, and business.
So when choosing your niche, pick something you love, and won’t get sick of! If it helps, purchase a planner or journal to identify your favorite areas. Dive deep into what fires you up. Whether it’s design, wellness, entrepreneurship, or another passion, choosing a niche you’re enthusiastic about is crucial. This foundation will keep you motivated and focused as your blog grows.
Step 2: Have an Identity
Your blog’s name is its first impression. While trends shift towards personal branding with yourname.com, the essence is to choose a name that resonates with you and your audience. Ensure it’s memorable and reflects you.
When you’ve decided on a name, you must check for availability. This is a common mistake I’ve seen from clients and others in the industry, great idea, secured LLC but the domain name is taken.
Step 3: Purchase Hosting & Domain
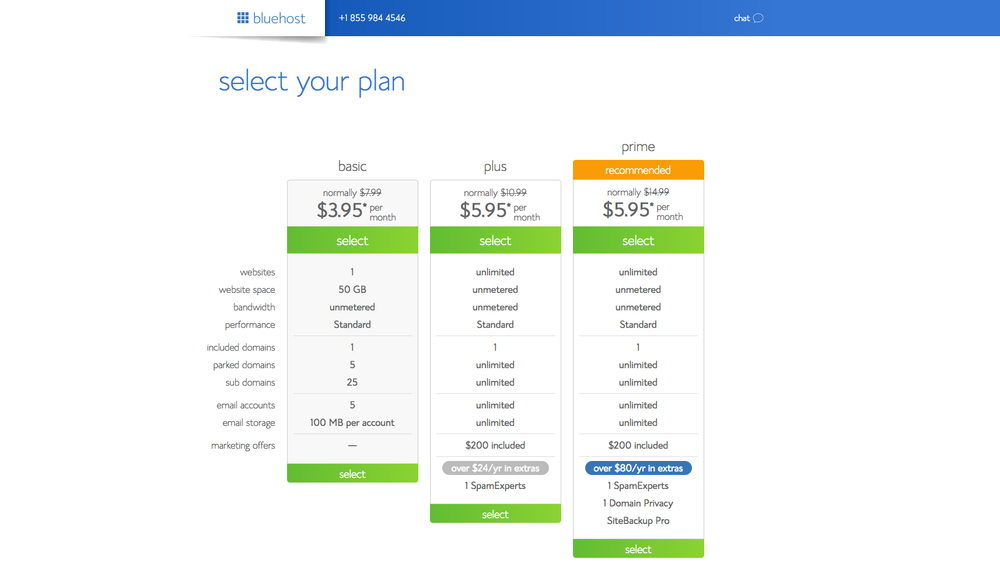
Start with purchasing a domain and hosting. Platforms like GoDaddy offer domain registration (about $2.99 to $15), but when it comes to hosting, Bluehost stands out for its affordability, ease of use, and exceptional support. They also bundle a free domain with their hosting package, making it a budget-friendly option for beginners. You must decide which option is best for you, but if you’re looking for ease for your self-hosted website, consider Bluehost.
So what is hosting?
Hosting is the network/company that gives your blog space on the internet. I’ve only used one hosting site EVER when I switched to WordPress and I love it.
Bluehost is the hosting I recommend! They make things super easy to set up and the customer service is amazing! I struggled, in the beginning, trying to understand the whole DNS, servers piece, but they made it easy. They also offer a free domain name with their service so you don’t have to buy the domain separately.

Not only is their service is $3.95/month, but it includes free domain name, free site builders, 1-step install for WordPress, and 24/7 support.
When buying through Bluehost, you will have to pay the yearly fee upfront, but they will first ask you what plan you’d like. I have the basic package and built my service from there.
Step 4: Set Up Social Accounts
Align your blog’s name across social media platforms to create a cohesive online presence. This consistency makes it easier for your audience to find and connect with you across the digital space. Ensure it’s consistent with your online presence and easy to find if you search on all platforms. If you’re not sure which username to use, you can search what’s available. This will show what is in use on various channels and social platforms. Remember to stick with the name of your blog, it will help your readers and followers find you easier in cyberspace.
Step 5: Create a Self-hosted WordPress Website
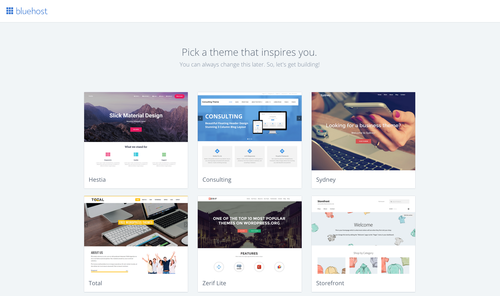
We’re almost there! Now, you’ll need to install WordPress service for the backend of your blog. I recommend WordPress for its versatility and wide range of themes. Your blog’s design should mirror your personal style and brand ethos. Whether you’re into minimalist chic or vibrant hues, your blog’s aesthetic should speak “you.”
Once WordPress is loaded, you can access your dashboard.
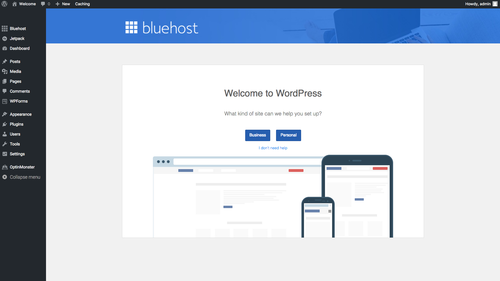
This is where you will do everything for your blog from customization to users to pages and post. The quickest way to access your dashboard is typing your URL /admin for example if your domain was www.blogqueen.com then use www.blogqueen.com/admin. This way the dashboard is at your fingertips – starting a blog has never been easier.
Step 6: Brand Yo’ self
This is probably my favorite part. It’s like hiring a stylist to dress you (which I’ve never done, but would love to experience one day). I recommend setting clear goals about the look and feel of your blog prior to launch. My blog has undergone many changes at one point in time I was attempting to follow the minimal trend, but I love the color too much. If you’re like me, be sure to focus on what represents you first. Don’t try to duplicate someone else because what works for them may not work for you. You can either hire a designer or use a template to help you.
Step 7: Defining Your Blog’s Pillars
You’ve got your niche, now how you plan on organizing this? What else will you talk about on your blog? This is where categories come in.
Categories structure your content and guide your audience through your blog. Choose categories that reflect your niche and interests but remain focused to avoid dilution of your core message.
Step 8: Write Posts & Pages
Plan your content around topics that excite you and provide value to your audience. Remember, quality trumps quantity. Also, don’t forget to include essential pages like About, Contact, and Legal pages to build trust and ensure transparency.
Don’t forget your legal pages because you want to make sure your content, design, and relationship with your readers is protected.
Step 9: Ready, Set, Launch
When you go live, embrace a content schedule that fits your flow. Promote your work across your chosen platforms and engage with your community. Use analytics tools like Google Analytics to understand your audience better and refine your strategy.
Not only will regular posting keep your readers interested, but it keeps you on track – I’m guilty of not posting frequently, but I’m building my own schedule that works for me.
Decide what works for you and stick to it! Once a week, twice, or even three times a week. However, don’t put out content for the sake of saying you completed a task. Take your time and post good content – if this means only one post a week than use that schedule.
When I first started I was posting a few times a month to build up my site’s content, but since have gone to once or twice a week. I also have a Youtube channel more geared towards wellness and entrepreneurship advice, so I try to keep my schedule around this as well.
When you start a blog, promoting your posts is essential for building traffic. I used to think I was posting too much, but let’s be real. No one is going to magically see your blog if you don’t put it out there. Along with posting you know the need to monitor your engagement, users, and visitors. This is helpful when you want to start working with brands as they’ll need these results and they help you gauge your rates.
If you need help, Google Analytics has a straightforward tutorial here.